In this blog post, I would walk you through creating a portfolio website with OctoberCMS. You can watch my video on YouTube that shows you same; in unison with this article if that would help you get it done faster.
Background
If you are looking to build a Portfolio website with OctoberCMS chances are you already at least know what it is especially in relation to other tools like WordPress and Laravel. But I would go ahead and tell you again briefly in my own words.
OctoberCMS just like WordPress is a content management system (CMS)! built on the most popular and appreciated PHP framework Laravel. But beyond that, it is a flat-file CMS meaning "everything" you do on it is saved as configuration/code in files, unlike with WordPress where the configurations are saved in a database. This makes it quite easy for you to move OctoberCMS projects around and works very well with git, Also OctoberCMS unlike WordPress is developer centric, it gives you more control by making it relatively easier to build plugins as everything is not a "Post" you can design extra functionalities in at least a sensible way writing code that follows the MVC pattern. So if you hate WordPress (which actually works as well 🙂) welcome!
The portfolio website we would construct essentially has a blog section, a projects section and a contact form.
What do we need to build this site?
This tutorial is not for absolute beginners but it not bad if you try as a starter it's not that complex with some grit a beginner can get this up but lets see the required background; Ideally you should have basic knowledge of HMTL/CSS, JavaScript, databases and PHP, it would also be great if you know some Laravel. Lastly, you should be able to setup up a LAMP, XAMP or MAMP stack. That in simple language means being able to set up a php development environment for at least Linux, Windows or macOS.
That said, you should have:
PHPwith some of its extensions and Libraries required byOctoberCMS- A database server like
MySQL - A text/code editor like
Sublime TextorVS Code
For advanced folks,
- A
Laraveldevelopment environment includingcomposerwould be great!
Basically that means OctoberCMS should be able to run on your system be it Windows, Linux or MacOS, I would provide some assistive material at the end of the article pointing to resources that can at least get, PHP, MYSQL and OctoberCMS running on your system.
Hence forth, I assume that you have the requirements necessary to run October so lets go ahead and create an October project, and start building our site immediately.
Creating an OctoberCMS project!
I have a Laravel Development Environment setup with Laravel's Homestead so among the many ways available to create an OctoberCMS project, I would use composer to create my project from the terminal like so:
composer create-project october/october devfoliodevfolio is the name of my project it could be anything you specify! Remeber, the most important thing is creating an OctoberCMS project no matter how, you must not use the terminal as our setups may be different.
Project Setup
After creating the project I would like to create a database for my site, and make sure my site is connected to the database correctly so I can run the migrations (get the necessary database tables created within the database), set up some environment configurations and then tryout my the installation.
Build a portfolio website!
No matter how you got one running, now that you have an empty OctoberCMS project up, lets started with actual work. To get this porfolio website up we need a theme an HTML theme! Naturally, we would have to make one! We are actually going to make one but not from scratch, I mean you really don't have time do you? 😏
Get the Theme
I search for themes to create this portfolio site and the one I liked that met the criteria; Open Source (free), simple, neat/classy and mobile friendly is DevFolio a developer portfolio theme that looks really great and you can customize it for anyone not just devs. Do well to download DevFolio.
DevFolio theme link : https://bootstrapmade.com/demo/DevFolio/
Now that the theme is available:
- Create an empty theme in
OctoberCMS - Add the pages we want our theme to have, in this case a
homepage,project-detailand ablog-detailpage. You might have noticed there's no blog and projects page. So, because projects and blogs are listed on the homepage. You would be able to attach a route to each page during the creation process and can give what ever routes you want. e.g/for home andblog/:slugfor blog articles. - Create a
mainlayout in the CMS section, you can update the project and blog detail page to share the common layout.
Copy the HTML code into the theme files
This is nothing more than copy and paste with a few tweaks! First;
- Copy all the resouces folders in the theme folder you unziped such as
css,img,libetc and then navigate to the project in your file system visitthemes -> devefolio -> assetsand you can past all the theme resouces there! Theme resources are basically css files, images, javascript files and the rest. - Now that we have the assets available within the project, copy the code for each file in the theme folder you downloaded and paste in the theme files within the
devfoliotheme folder! For example copy the code withinindex.htmlin the unzipped theme folder and paste inhome.htmor whatever file name you gave you homepage within the CMS. Do this for all the pages of theme!
Loading theme assets
If you have successful you should be to visit pages for you portfolio site but these pages would look pretty awful and there is no CSS or styling loaded and we have to see how to load that! In OctoberCMS the theme-filter is used to attach assets to pages.
So we would make the following changes to all files referenced from within our theme.
All .css files looking like :
<script type="text/javascript" src="assets/css/style.css"></script>would become
<script type="text/javascript" src="{{ 'assets/css/style.css'|theme }}"></script>All .js files looking like :
<script type="text/javascript" src="assets/js/script.js"></script>would become
<script type="text/javascript" src="{{ 'assets/js/script.js'|theme }}"></script>That's too many examples already! Basically we are just introducing Octobers templating language, we use {{ }} to evaluate expressions and in this case evaluate a path within apostrophes we attach the theme-filter mentioned above to let October know that it's a theme asset and it must load if from a special location. (assets)
Get the Plugins
You can get the plugins by simply searching their names from the store wihin the OctoberCMS dashboard. More information about each plugin we use can be obtained from their respective links below.
Indikator.News(https://octobercms.com/plugin/indikator-news)ArrizalAmin.Portfolio(https://octobercms.com/plugin/arrizalamin-portfolio)Laminsanneh.Flexicontact(https://octobercms.com/plugin/laminsanneh-flexicontact)
Integrating Plugins with theme
To integrate the plugin with the theme we need to add the various plugin components on the different pages we need. For example we need the post list and project list components on the homepage and then a post item and project item on the blog detail and project detail pages respectively.
There's a lot going on that could spiral into several paragraphs of explaination, here I provide the snippets for you to copy and paste and link to part of the video where this is being done.
Adding blog list component;
After adding the blog list component to home page as shown below replace the blog section row containing the post list with the snippet following.
      <div class="row">
      	{% for post in posts %}
        <div class="col-md-4">
          <div class="card card-blog">
            <div class="card-img">
              <a href="{{ post.url }}"><img src="{{ post.image|media }}" alt="" class="img-fluid"></a>
            </div>
            <div class="card-body">
              <div class="card-category-box">
                <div class="card-category">
                  <h6 class="category">Travel</h6>
                </div>
              </div>
              <h3 class="card-title"><a href="{{ post.url }}">{{ post.title }}</a></h3>
              <p class="card-description">
               {{ post.introductory|length > 100 ? post.introductory|slice(0, 100)|striptags~ '…' : post.introductory|striptags }}
              </p>
            </div>
          </div>
        </div>
        {% endfor %}

      </div>
Adding project list component;
After adding the project list component to home page as shown below replace the section row containing the project list with the snippet following.
      <div class="row">
      {% for item in portfolio.portfolio %}
        <div class="col-md-4">
       {% set image = item.images.first %}
          <div class="work-box">
            <a href="{{ item.pageUrl }}" >
              <div class="work-img">
                    <img src="{{ image.path }}" class="img-responsive" alt="{{ image.title }}">
              </div>
              <div class="work-content">
                <div class="row">
                  <div class="col-sm-8">
                    <h2 class="w-title">{{ item.title }}</h2>
                    <div class="w-more">
                      <span class="w-ctegory">Web Design</span> / <span class="w-date">{{ item.created_at|date('j m Y') }}</span>
                    </div>
                  </div>
                  <div class="col-sm-4">
                    <div class="w-like">
                      <span class="ion-ios-plus-outline"></span>
                    </div>
                  </div>
                </div>
              </div>
            </a>
          </div>
        </div>
        {% endfor %}

      </div>
Blog detail page and component;
title = "blog-detail"
url = "/blog/:slug"
layout = "main"
is_hidden = 0

[newsPost]
slug = "{{ :slug }}"
==
{% set post = newsPost.post %}

{% put head %}
{% partial 'head' title=post.title %}

<meta name="description"
  content="{{ post.introductory|length > 60 ? post.introductory|slice(0, 60)|striptags ~ '…' : post.introductory|striptags }}">
<link rel="canonical" href="{{ post.url }}">
<link rel="image_src" href="{{ post.image|media }}" type="image/png" />
<meta name="keywords"
  content="{{ post.category.name}}, {% for tag in post.tags %}{{ tag }}{% if not loop.last %},{% endif %} {% endfor %}">


<!-- Facebook Meta Tags -->
<meta property="og:title" content="{{ post.title }} | Fenn-CS" />
<meta property="og:type" content="article" />
<meta property="og:description"
  content="{{ post.introductory|length > 100 ? post.introductory|slice(0, 100)|striptags~ '…' : post.introductory|striptags}}" />
<meta property="og:image" content="{{ post.image|media }}" />

<!-- Twitter Card data -->
<meta name="twitter:card" content="summary">
<meta name="twitter:site" content="Fenn-CS">
<meta name="twitter:title" content="{{ post.title }} | Fenn-CS">
<meta name="twitter:description"
  content="{{ post.introductory|length > 60 ? post.introductory|slice(0, 60)|striptags~ '…' : post.introductory|striptags}}">
<meta name="twitter:creator" content="{{ post.user.getFullNameAttribute() }}">
<meta name="twitter:image" content="{{ post.image|media }}">
{% endput %}

<!--/ Intro Skew Star /-->
<div class="intro intro-single route bg-image" style="background-image: url(img/overlay-bg.jpg)">
  <div class="overlay-mf"></div>
  <div class="intro-content display-table">
    <div class="table-cell">
      <div class="container">
        <h2 class="intro-title mb-4"> {{ post.title }} </h2>
        <ol class="breadcrumb d-flex justify-content-center">
          <li class="breadcrumb-item">
            <a href="#">Home</a>
          </li>
          <li class="breadcrumb-item">
            <a href="#">{{ post.category.name }}</a>
          </li>

        </ol>
      </div>
    </div>
  </div>
</div>
<!--/ Intro Skew End /-->

<!--/ Section Blog-Single Star /-->
<section class="blog-wrapper sect-pt4" id="blog">
  <div class="container">
    <div class="row">
      <div class="col-md-8">
        <div class="post-box">
          <div class="post-thumb">
            <img src="{{ post.image|media }}" class="img-fluid" alt="">
          </div>
          <div class="post-meta">
            <h1 class="article-title">{{ post.title }}</h1>
            <ul>
              <li>
                <span class="ion-ios-person"></span>
                <a href="#">{{ post.user.getFullNameAttribute() }}</a>
              </li>
              <li>
                <span class="ion-pricetag"></span>
                <a href="#">{{ post.category.name }}</a>
              </li>
              <!--      <li>
                  <span class="ion-chatbox"></span>
                  <a href="#">14</a>
                </li> -->
            </ul>
          </div>
          <div class="article-content">
            {{ post.introductory|raw }}
            {{ post.content|raw }}
          </div>
        </div>


      </div>
      <div class="col-md-4">
        <div class="widget-sidebar widget-tags">
          <h5 class="sidebar-title">Tags</h5>
          <div class="sidebar-content">
            <ul>
              <li>
                <a href="#">Web.</a>
              </li>
              <li>
                <a href="#">Design.</a>
              </li>
              <li>
                <a href="#">Travel.</a>
              </li>
              <li>
                <a href="#">Photoshop</a>
              </li>
              <li>
                <a href="#">Corel Draw</a>
              </li>
              <li>
                <a href="#">JavaScript</a>
              </li>
            </ul>
          </div>
        </div>
      </div>
    </div>
  </div>
</section>
<!--/ Section Blog-Single End /-->

<!--/ Section Contact-Footer Star /-->
<section class="paralax-mf footer-paralax bg-image sect-mt4 route" style="background-image: url(img/overlay-bg.jpg)">
  <div class="overlay-mf"></div>
Project detail page component;
title = "project-detail"
url = "/projects/:item_slug"
layout = "main"
is_hidden = 0

[item]
item = 1
itemSlug = "{{ :item_slug }}"
catListPage = "portfolio/category"
tagListPage = "portfolio/tag"
==
{% set project = item.item %}

{% put head %}
   {% partial 'head' title=project.title %}
{% endput %}

<!--/ Intro Skew Star /-->
  <div class="intro intro-single route bg-image" style="background-image: url(img/overlay-bg.jpg)">
    <div class="overlay-mf"></div>
    <div class="intro-content display-table">
      <div class="table-cell">
        <div class="container">
          <h2 class="intro-title mb-4"> {{ project.title }} </h2>
          <ol class="breadcrumb d-flex justify-content-center">
         <!--    <li class="breadcrumb-item">
              <a href="#">Home</a>
            </li>
            <li class="breadcrumb-item">
              <a href="#">{{ project.category.name }}</a>
            </li>
            -->
          </ol>
        </div>
      </div>
    </div>
  </div>
  <!--/ Intro Skew End /-->

  <!--/ Section Blog-Single Star /-->
  <section class="blog-wrapper sect-pt4" id="blog">
    <div class="container">
      <div class="row">
        <div class="col-md-8">
          <div class="post-box">
            <div class="post-thumb">
            	{% set image = project.images.first %}
              <img src="{{ image.path }}" class="img-fluid" alt="">
            </div>
            <div class="post-meta">
              <h1 class="article-title">{{ project.title }}</h1>
              <ul>
             <!--    <li>
                  <span class="ion-ios-person"></span>
                  <a href="#">{{ project.user.getFullNameAttribute() }}</a>
                </li>
                <li>
                  <span class="ion-pricetag"></span>
                  <a href="#">{{ project.category.name }}</a>
                </li> -->
           <!--      <li>
                  <span class="ion-chatbox"></span>
                  <a href="#">14</a>
                </li> -->
              </ul>
            </div>
            <div class="article-content">
               {{ project.description|raw }}
            </div>
          </div>


        </div>
       <!--  <div class="col-md-4">
          <div class="widget-sidebar widget-tags">
            <h5 class="sidebar-title">Tags</h5>
            <div class="sidebar-content">
              <ul>
                <li>
                  <a href="#">Web.</a>
                </li>
                <li>
                  <a href="#">Design.</a>
                </li>
                <li>
                  <a href="#">Travel.</a>
                </li>
                <li>
                  <a href="#">Photoshop</a>
                </li>
                <li>
                  <a href="#">Corel Draw</a>
                </li>
                <li>
                  <a href="#">JavaScript</a>
                </li>
              </ul>
            </div>
          </div>
        </div> -->
      </div>
    </div>
  </section>
  <!--/ Section Blog-Single End /-->

  <!--/ Section Contact-Footer Star /-->
  <section class="paralax-mf footer-paralax bg-image sect-mt4 route" style="background-image: url(img/overlay-bg.jpg)">
    <div class="overlay-mf"></div>
Power the contact form
Replace the form in home.htm with following code, if you check closely just the a few parameters have been added to the opening form tag, but to avoid any confusion you may just replace the whole form.
        <form class="flexiContactForm" role="form"
                               data-request="{{ contactForm }}::onMailSent"
                               data-request-update="'{{ contactForm }}::confirm': '.confirm-container'">
                      <div id="sendmessage">Your message has been sent. Thank you!</div>
                      <div id="errormessage"></div>
                      <div class="row">
                        <div class="col-md-12 mb-3">
                          <div class="form-group">
                            <input type="text" name="name" class="form-control" id="name" placeholder="Your Name" data-rule="minlen:4" data-msg="Please enter at least 4 chars" />
                            <div class="validation"></div>
                          </div>
                        </div>
                        <div class="col-md-12 mb-3">
                          <div class="form-group">
                            <input type="email" class="form-control" name="email" id="email" placeholder="Your Email" data-rule="email" data-msg="Please enter a valid email" />
                            <div class="validation"></div>
                          </div>
                        </div>
                        <div class="col-md-12 mb-3">
                            <div class="form-group">
                              <input type="text" class="form-control" name="subject" id="subject" placeholder="Subject" data-rule="minlen:4" data-msg="Please enter at least 8 chars of subject" />
                              <div class="validation"></div>
                            </div>
                        </div>
                        <div class="col-md-12 mb-3">
                          <div class="form-group">
                            <textarea class="form-control" name="body" rows="5" data-rule="required" data-msg="Please write something for us" placeholder="Message"></textarea>
                            <div class="validation"></div>
                          </div>
                        </div>
                         {% if contactForm.enableCaptcha %}
                           <div class="form-group">
                                <div class="g-recaptcha" data-sitekey="{{ contactForm.siteKey }}"></div>
                           </div>
                         {% endif %}
                        <div class="col-md-12">
                          <button type="submit" class="button button-a button-big button-rouded">Send Message</button>
                        </div>
                      </div>
                    </form>
Wrap Up
Adding dynamic place holders and partials
I would add the following placeholder to the head of the main layout :
{% placeholder head %}I would add the following partial
<title> {{ title ?: '' }} | Fenn-CS </title>SEO for Blog and Portfolio Projects
<meta name="description" content="{{ post.introductory|length > 60 ? post.introductory|slice(0, 60)|striptags ~ '…' : post.introductory|striptags }}">
<link rel="canonical" href="{{ post.url }}">
<link rel="image_src" href="{{ post.image|media }}" type="image/png" />
<meta name="keywords" content="{{ post.category.name}}, {% for tag in post.tags %}{{ tag }}{% if not loop.last %},{% endif %} {% endfor %}">
<!-- Facebook Meta Tags -->
<meta property="og:title" content="{{ post.title }} | Fenn-CS" />
<meta property="og:type" content="article" />
<meta property="og:description" content="{{ post.introductory|length > 100 ? post.introductory|slice(0, 100)|striptags~ '…' : post.introductory|striptags}}" />
<meta property="og:image" content="{{ post.image|media }}" />
<!-- Twitter Card data -->
<meta name="twitter:card" content="summary">
<meta name="twitter:site" content="Fenn-CS">
<meta name="twitter:title" content="{{ post.title }} | Fenn-CS">
<meta name="twitter:description" content="{{ post.introductory|length > 60 ? post.introductory|slice(0, 60)|striptags~ '…' : post.introductory|striptags}}">
<meta name="twitter:creator" content="{{ post.user.getFullNameAttribute() }}">
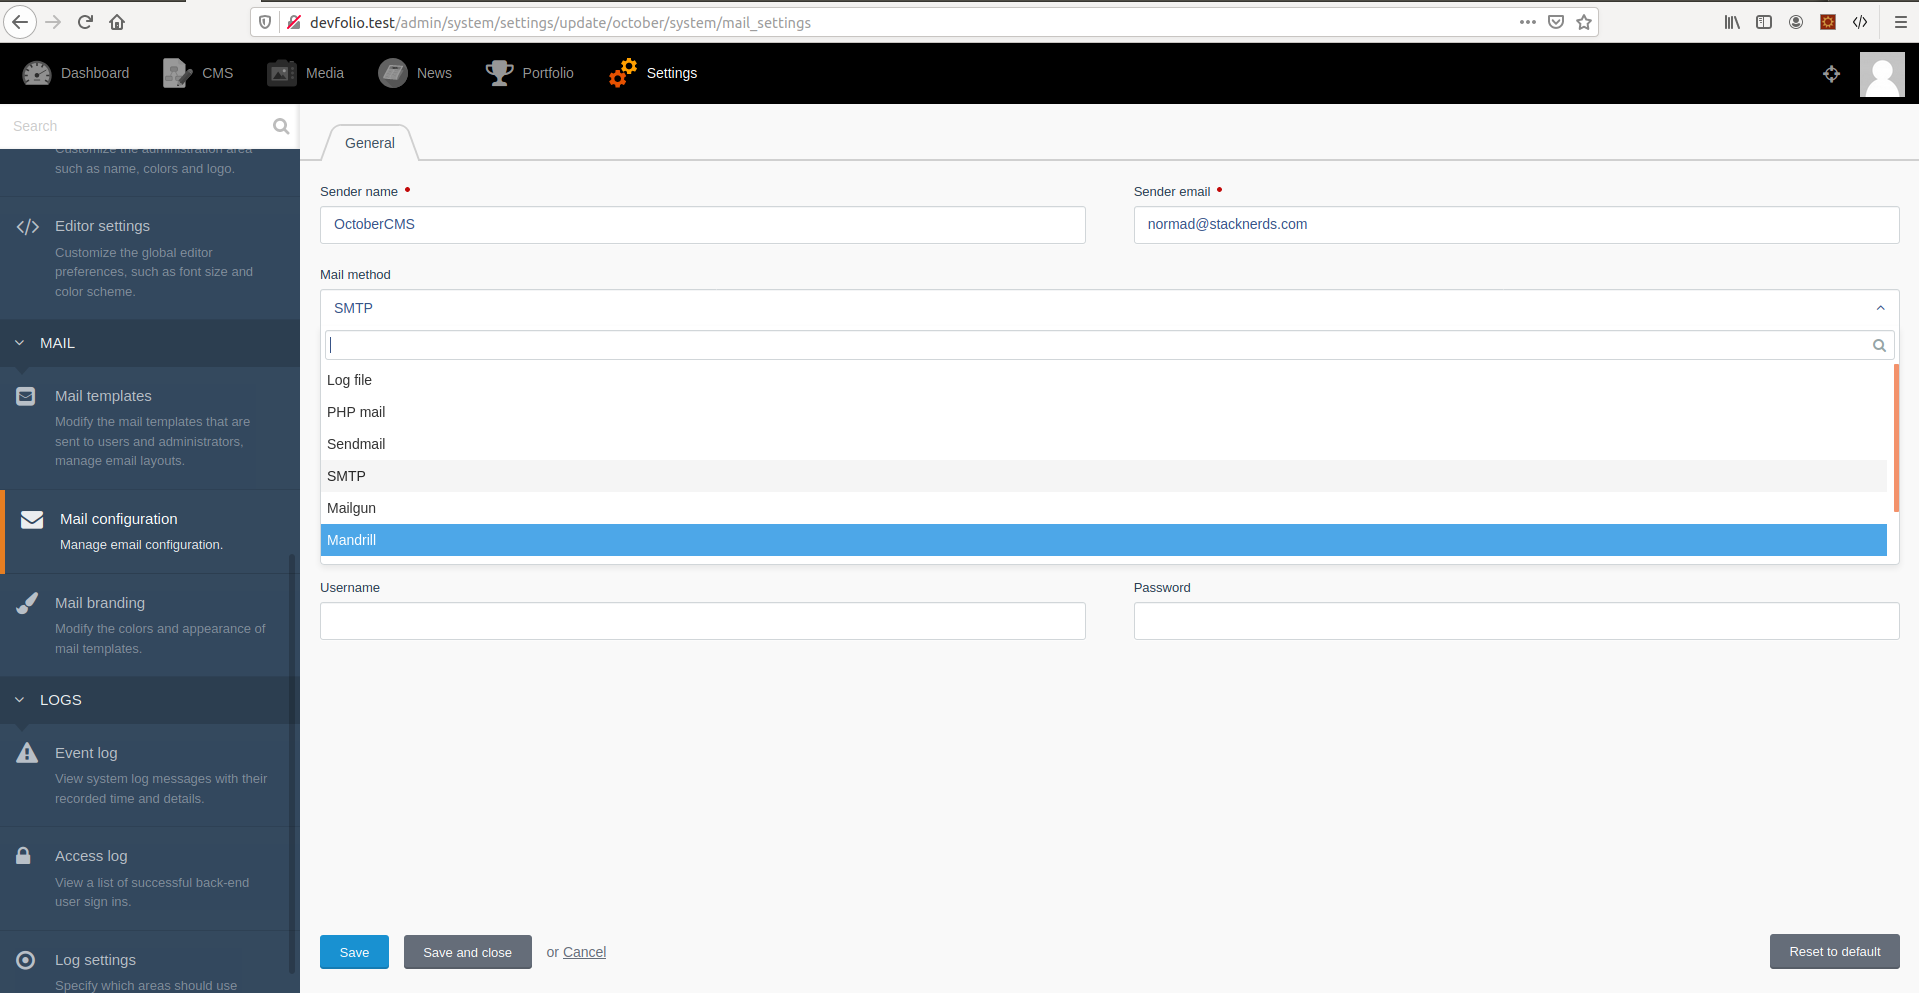
<meta name="twitter:image" content="{{ post.image|media }}">Email setup with SMTP
To be able to send emails, you need to configure you site to work with a provider. Which ever provider you choose is up to you but OctoberCMS has out of box support for Mailgun, SendMail, Mandrill amongts other options, found on the settings page, I just selected SMTP and added my Mailgun credentials! In the video, I did mention sendpulse due to its free volume you might want to check that out if you dont have something you use already.
Resources
Github : https://github.com/StackNerds/portfolio-website-octobercms
Windows
- How to set up a PHP development environment on Windows Subsystem for Linux (WSL)
- A simplified approach to installing laravel using Homestead on windows
- Install Apache, PHP, MySQL on Windows(YouTube)
Linux
General

![I want to learn how to code [Part 2]](/content/images/size/w300/2020/01/programming-and-csc.png)

![I want to learn how to code [Part 2]](/content/images/size/w600/2020/01/programming-and-csc.png)
![I want to learn how to code. [Part 1]](/content/images/size/w600/2020/01/code-screen-stacknerds.jpg)